User Guide
Table of Contents
1. Introduction
Welcome to the Teletubbies User Guide! This guide is designed to provide readers with an overview of how to use Teletubbies on a daily basis.
Maybe you have just downloaded Teletubbies and want to learn about how to get started. Maybe you are a current user and need a refresher on the available commands. Or maybe, you have come across our product and are simply curious about our features.
Regardless of why you’re here, we hope that this guide proves to be useful for you!
1.1. What is Teletubbies?
Teletubbies is a desktop app for telemarketers and telemarketing supervisors to manage their customer contacts. Using Teletubbies, you can:
- Manage customers’ contact details
- Manage and view your telemarketing progress (as a Telemarketer)
- Manage and view telemarketing progress of telemarketers you are in charge of (as a Telemarketing Supervisor)
Teletubbies is optimized for use via a Command Line Interface (CLI), meaning that most of the commands are issued by simply typing it into our application. If you are used to typing on a keyboard, you can get your telemarketing tasks done much faster! But don’t worry if you aren’t so used to typing fast - our intuitive Graphical User Interface (GUI) will help you slowly adjust to using our CLI.
With Teletubbies, your daily telemarketing workflow can be so much more efficient! So what are you waiting for? Get started with Teletubbies!
2. About this User Guide
2.1. Purpose of this User Guide
This document is designed to provide documentation for people who will be using Teletubbies on a day-to-day basis. As most users of Teletubbies will have access to the features documented here, we recommend that you, as a user, read through this User Guide before using Teletubbies for the first time.
If you are a Telemarketer or a Telemarketer supervisor, this User Guide is designed to help you become familiar with the features available in Teletubbies, so that you may have a smooth and seamless user experience with us. Telemarketers and telemarketer supervisors, such as yourselves, should look through this User Guide and try out some of our available features!
2.2. Structure of this User Guide
There are many useful features included in Teletubbies. As a result, we have decided to structure our User Guide in a manner that allows you to easily find what you are looking for, without getting overwhelmed.
In Section 1: Introduction, you will find a general overview of what Teletubbies is about.
In Section 2: About this User Guide, you will find tips and advice on how to read and navigate through this document.
In Section 3: Quick Start, you will find a step-by-step guide to help you get started with using Teletubbies.
In Section 4: Features, you will find documentation on all of Teletubbies’ commands and features.
In Section 5: FAQ, you will find the answers to some of the most frequently asked questions regarding Teletubbies.
In Section 6: Command Summary, you will find a summarised table of commands available in Teletubbies.
In Section 7: Glossary, you will find the meanings and definitions of some of the more technical terms used in this document.
Each of these sections and their sub-sections are accessible through the Table of Contents, which can be found at the beginning of this document.
![]() Note:
Note:
We have grouped the Features into 4 categories in order to give you a bird’s eye view of some of the features available! You can peek into System commands to take a look at some of the system-level features available such as help and import. Contact commands includes all the commands which allow you to modify the contacts in your contact list, while List commands includes commands to view a more specific list of contacts.
2.3. Reading this User Guide
This User Guide is written with chronological navigation in mind. Users can scroll through the document to navigate from section to section.
If you are new to Teletubbies, we recommend that you take this approach, as it will give a comprehensive introduction to the available commands and features.
For more experienced users who know what they are looking for and want to quickly jump to a specific section, you can move to your section of choice using the Table of Contents, or from the Command Summary section if you are interested in learning about the usage of a specific command.
Alternatively, you may use the Windows shortcut Ctrl + F or the Mac shortcut Command + F to find specific keywords.
The following subsections provide explanations on the various symbols and formatting used in this User Guide, as well as the layout of the application’s User Interface (UI). We recommend that you familiarise yourself with these subsections so that you may be able to understand our User Guide more intuitively.
2.3.1. Special Icons and Symbols
Icons and Symbols discussed in this section may be used in various relevant areas of this User Guide.
Additional Information
Messages that appear in an additional information block are additional information that may be useful to know when using Teletubbies. These are used in explanations of various features to enhance the readability of this User Guide!
![]() Note:
Note:
Example of Additional Information!
Important Information
Messages that appear in an Important information block are important information or warnings that you should take note of when using Teletubbies.
![]() Important:
Important:
Example of Important Information!
Tips
Messages that appear in a tip block may serve as useful hints that can improve your user experience with Teletubbies.
![]() Tip:
Tip:
Example of a Tip!
Quotes
Messages that appear as quotes (shown below) are used to explain examples given for the various commands available in Teletubbies.
Example of a Quote!
2.3.2. Layout of the UI
Different sections of the Teletubbies application window will be referred to by the names described in the image shown below:
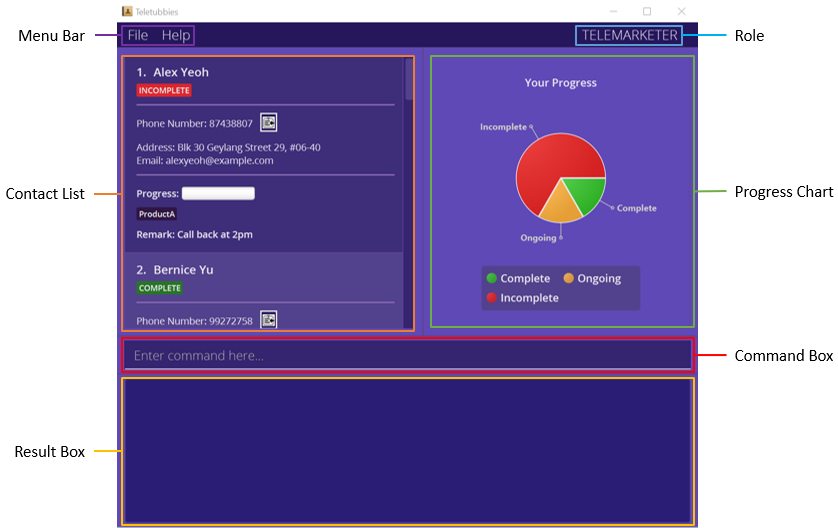
The UI has been designed primarily to be navigated using the command line interface. Users can enter commands into the command box and press ENTER to execute them. The result box will be updated with information on whether the command has been successfully executed, and if not, it will display an appropriate error message. Depending on the command executed, the main panel may also be updated based on the command executed.
When entering a command, you may find it helpful to see a history of your previous commands. To do so, you can simply press UP or DOWN while typing to navigate through the command history list, or alternatively, you can use the history command.
2.3.3. Command Flags
Commands in Teletubbies are constructed using a command word. Each command can take in multiple flags and parameters in succession. In general, the format is:
[Command word] [[Flag] [Parameter]]…
If this sounds complicated, let’s take a look at at an example:
add -n John Doe -p 91827364
In this example, the command word is add, the flags are -n and -p, and the parameters are John Doe
and 91827364. Here, each parameter corresponds to each flag to form a pair. Each of these pairs are
specified in succession after the command word!
![]() Note:
Note:
The order of the flag-parameter pairs do not matter. For instance, add -n John Doe -p 91827364 and add -p
91827364 -n John Doe will be treated as the same command.
Below is the list of available flags and their meanings:
-
-n: Name -
-p: Phone number -
-a: Address -
-e: Email Address -
-i: Index -
-t: Tag -
-v: Value -
-r: Remark -
-role: Role
Additionally, there are special flags that are feature-specific and do not require any parameters:
-
-s: Supervisor -
-ong: Ongoing -
-inc: Incomplete
![]() Important:
Important:
If you are a new user, this list may be confusing. Hence, we recommend that you read through the subsections under the Features section that are dedicated to each feature. These subsections will use comprehensive examples to clearly outline which of these flags correspond to each of the commands, and will explain how to use them, as well as what parameters they take in (or if they take in parameters at all).
2.3.4. Command Format
Commands that are discussed in this User Guide follow these specifications:
-
Words in
UPPER_CASEare the parameters to be supplied by the user.
e.g. inadd -n NAME,NAMEis a parameter which can be used asadd -n John Doe. -
Items in square brackets are optional.
e.g.-n NAME [-t TAG]can be used as-n John Doe -t friendor as-n John Doe. -
Items with
… after them can be used multiple times, or even left blank.
e.g.[-t TAG]…can be used as ` ` (i.e. 0 times),-t friend,-t friend -t familyetc. -
Parameters can be in any order.
e.g. if the command specifies-n NAME -p PHONE_NUMBER,-p PHONE_NUMBER -n NAMEis also acceptable.
In addition, when entering the commands into the command box, the application will interpret the commands following these specifications:
-
If a parameter is expected only once in the command but you specified it multiple times, only the last occurrence of the parameter will be taken.
e.g. if you type in-p 12341234 -p 56785678, only-p 56785678will be considered. -
Extraneous parameters for commands that do not take in parameters (such as
help,list,exitandclear) will be ignored.
e.g. if you type inhelp 123, it will be interpreted ashelp.
![]() Tip:
Tip:
- Parameters refer to information that is to be included as an input to a command.
3. Quick Start
-
Ensure you have Java
11or above installed on your Computer. If not, you can install it from here. Please ensure to download the correct version based on your operating system (e.g. Windows / macOS / Linux) and follow the Java installation instructions. For more information on how to install Java11, please refer to this article. -
Download the latest
teletubbies.jarfrom here. -
Copy the file to the folder you want to use as the home folder for your Teletubbies app. For beginners, you can simply create a folder on your desktop and move the downloaded
teletubbies.jarinto the folder. -
Double-click the file to start the app. A GUI similar to below should appear in a few seconds. Note that when you start the app for the first time, the app should contain some sample data.
- Try typing the following commands in the command box and press Enter to execute it.
E.g. typing
helpand pressing Enter will open the help window.Some example commands you can try:
-
list: Lists all contacts. -
add -n Mark Tan -p 87654321: Adds a contact namedMark Tanto Teletubbies, with the phone number 87654321. -
delete -i 2: Deletes the contact namedJennifer Liew, which is the 2nd contact shown in the list on the previous page. -
done 1: Marks the contact namedJohn Doeas done, which is the 1st contact shown in the list on the previous page. -
clear: Deletes all contacts. -
exit: Exits the app.
-
- You’re all set! Please refer to the Features section for details on each command.
4. Features
Features and corresponding commands have been categorised into:
4.1. System commands
These commands are related to the Teletubbies application as a whole. The commands available are:
Viewing help: help
Upon entering the help command, another window pops up with our comprehensive User Guide (as shown below) which you
can read by scrolling up and down! This command is especially useful for when you’ve forgotten the
format of a particular command, or if you’re unsure what commands are available at your disposal.
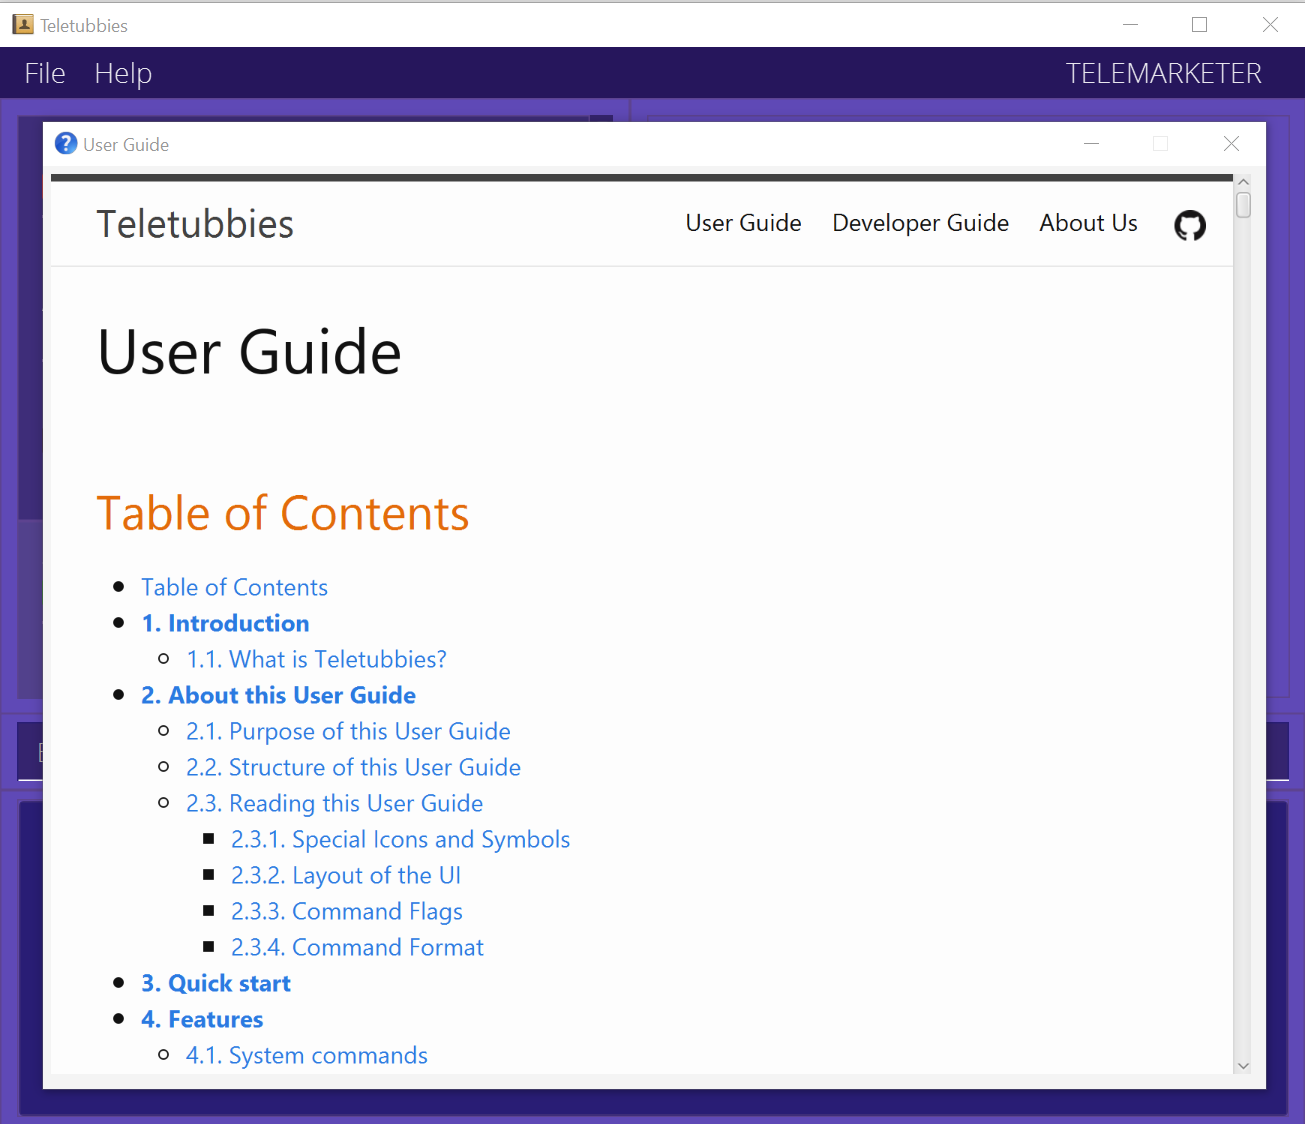
Format: help
Setting your profile: profile
The profile command will help you to set your user profile for Teletubbies.
In Teletubbies, your user profile consists of your name and role.
Your name should be the name that you use in the workplace, so that you can be identifiable by your co-workers and supervisors.
Your role should be according to your job scope:
- If your job is a telemarketing job, and you want to be able to view your customers
in an organised list and keep track of your progress, then your role is
Telemarketer. - If your job involves keeping track of progress for telemarketers under you, then
your role is
Supervisor.
The reason we specify your role is so that Teletubbies can better accommodate your needs by providing you with the suitable features tailored to your needs.
Once you set your profile up with the profile command, you should be good to go!
Format: profile -n NAME -role ROLE
Examples:
-
profile -n David Wong -role TelemarketerThis command will set your name as “David Wong” and your role as “Telemarketer”.
-
profile -n -role TelemarketerThis command will set your role as “Telemarketer”.
-
profile -n Anne Goh -role SupervisorThis command will set your name as “Anne Goh” and your role as “Supervisor”.

![]() Note:
Note:
Teletubbies provides the option for users to leave their names as empty, but it is highly recommended for you to set your name for identification purposes.
Additionally, the profile command can only be used to set up your user profile once. To modify your name or role, please
follow the steps here.
![]() Important:
Important:
If you are opening Teletubbies for the first time, you should be sure to set your profile before doing any actions.
Importing contacts: import
The import command will help you to import a set of customer contact data into the application. If you are a
telemarketer you will likely use this command frequently to load customer contact lists from your supervisor.
You can issue this command by either typing it into the CLI (import), or going to the menu bar at the top and
selecting File -> Import. Once the command is issued, Teletubbies will open a file selector window as shown below.
Before Import:

After Import:
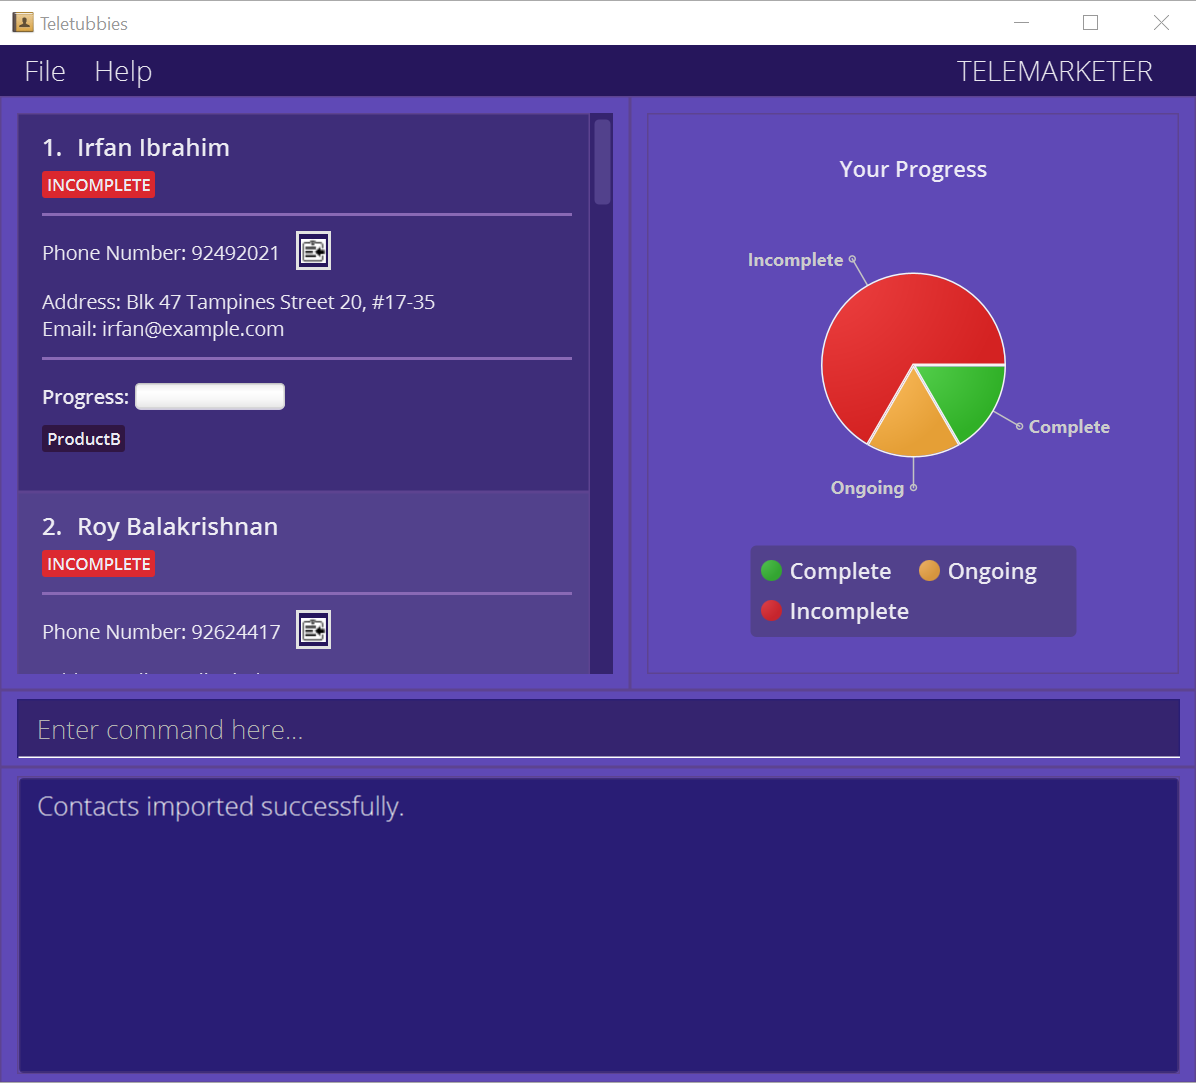
The data to be imported must be a JSON file, with the file extension .json.
Format: import
import will cause all our current contacts to be wiped from Teletubbies! If you wish to keep
your current contacts too, check out merge!
Merging contacts: merge
The merge command is a special kind of importing, and it will help you to merge a set of customer contact data
with the current data inside the application. If you are supervisor, you will likely use this command frequently to
update your contact list with the latest versions of your employees’ contact lists.
You can issue this command by either typing it into the CLI (merge), or going to the menu bar at the top and
selecting File -> Merge. Once the command is issued, Teletubbies will open a file selector window as shown below.
Before Merge:
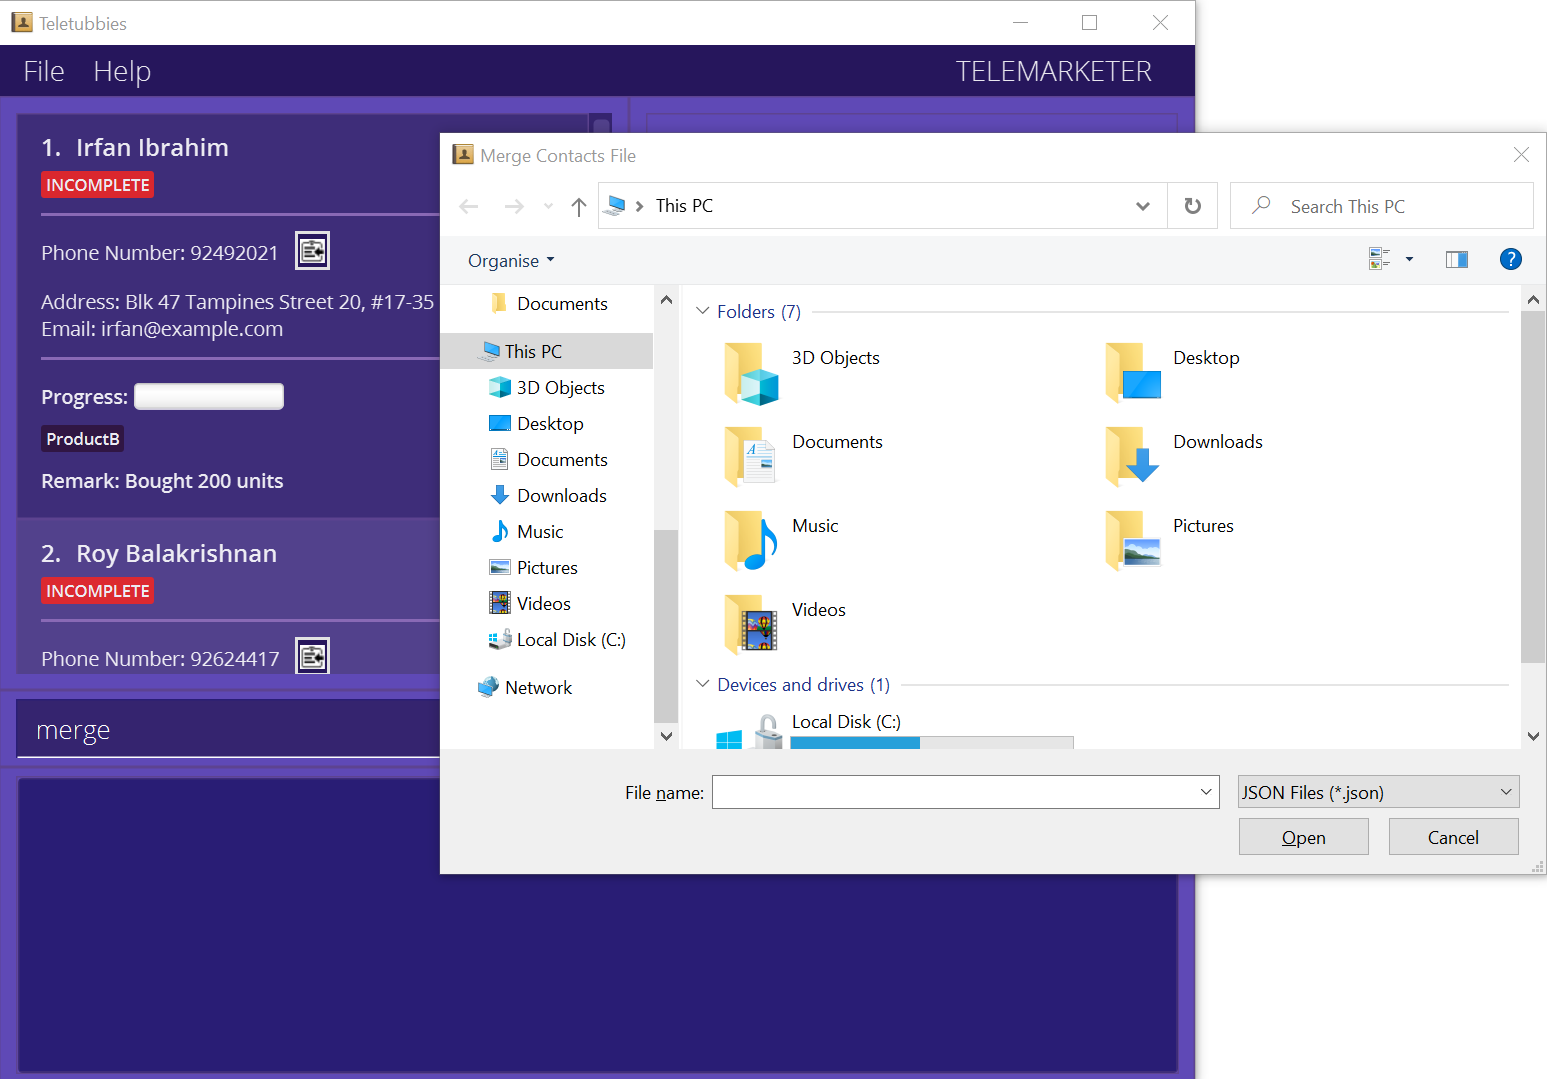
After Merge:
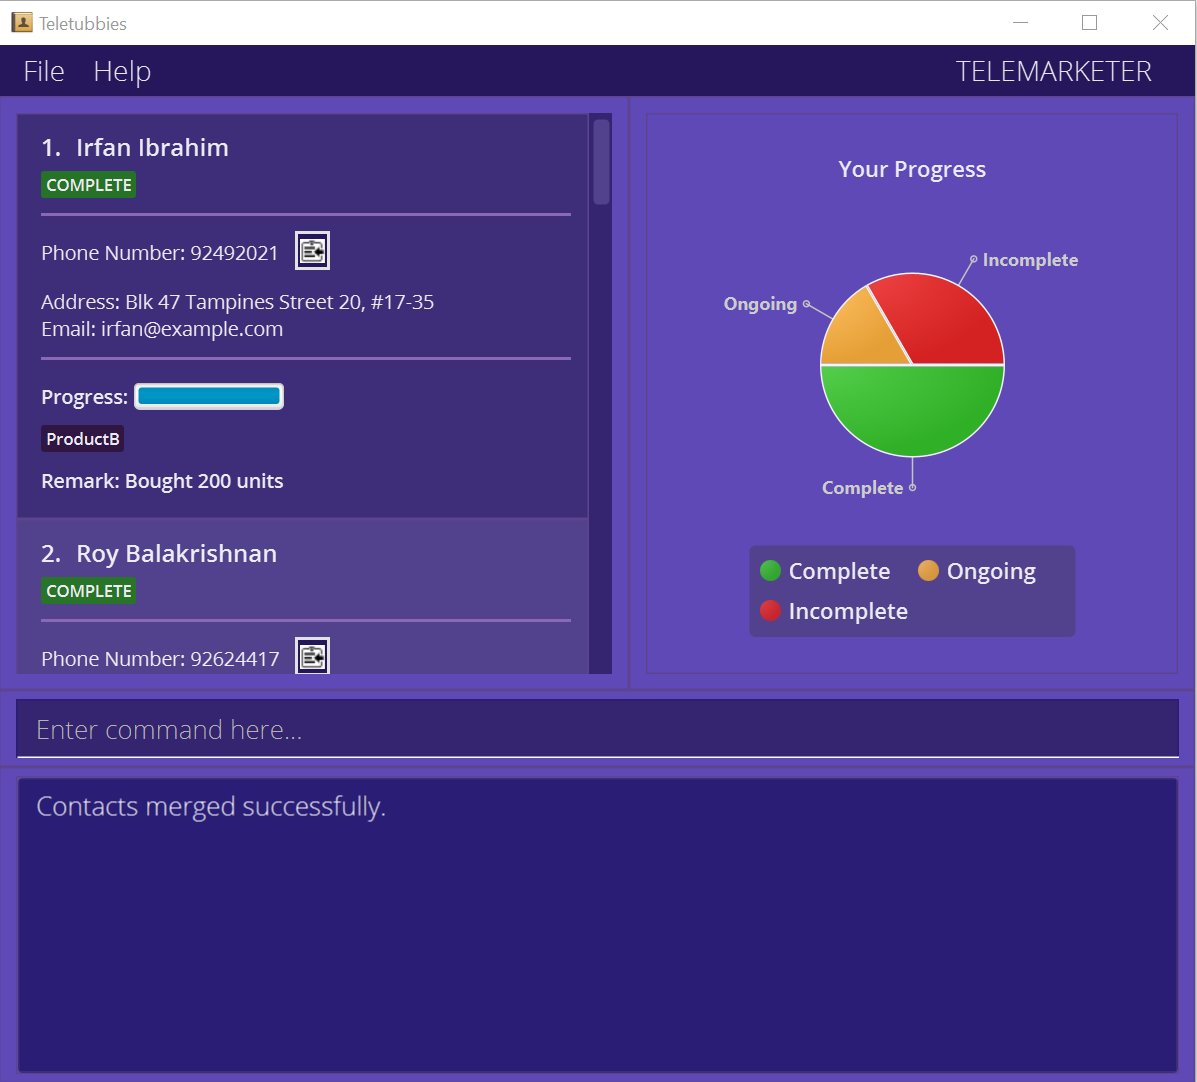
The data to be imported and merged must be a JSON file, with the file extension .json.
Format: merge
Exporting contacts: export
The export command will help you to export selected customer contact data in the application. If you are a
supervisor, you will find this command especially useful when you want to generate contact lists for your employees.
If you are a telemarketer, you will also find this command useful for sending your updated contact lists back to your
supervisor.
You can issue this command by either typing it into the CLI (export), or going to the menu bar at the top and
selecting File -> Export. Note that there is a crucial difference here:
- If you choose to type it into the CLI (
export), you will be able to specify which contacts you want to export, based on the tags. - If you select
File -> Exportthrough the GUI, Teletubbies will automatically export ALL contacts, regardless of tags.
Once the command is issued, Teletubbies will ask you to confirm the export, as shown below.
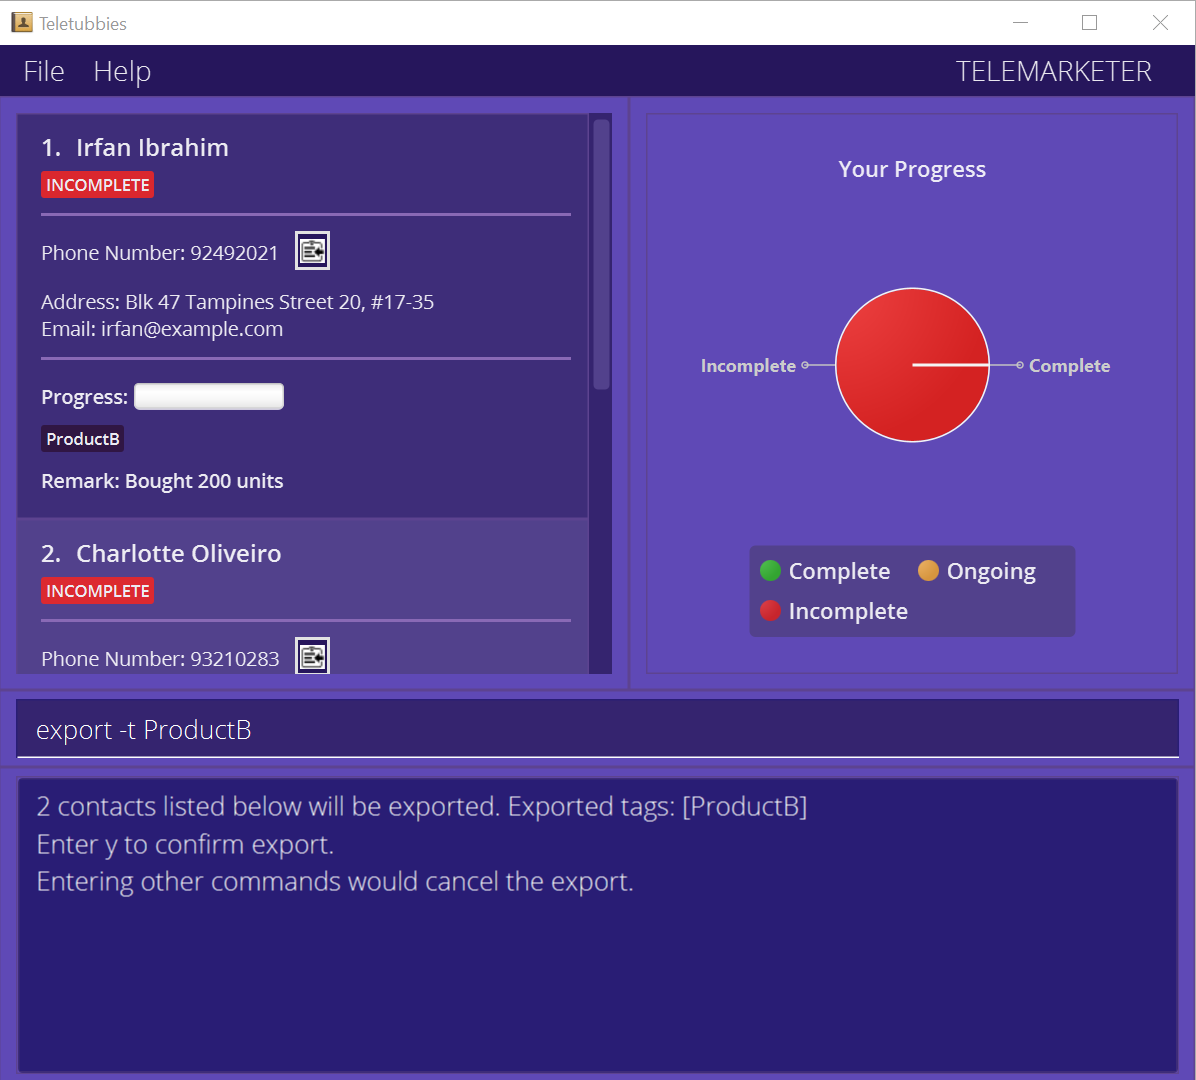
Type y to confirm the export. If you decide to cancel the export, you can type in any other command. Teletubbies will automatically cancel the export
for you as long as the next command received is NOT y.
After export has been confirmed, Teletubbies will open a file selector window as shown below.
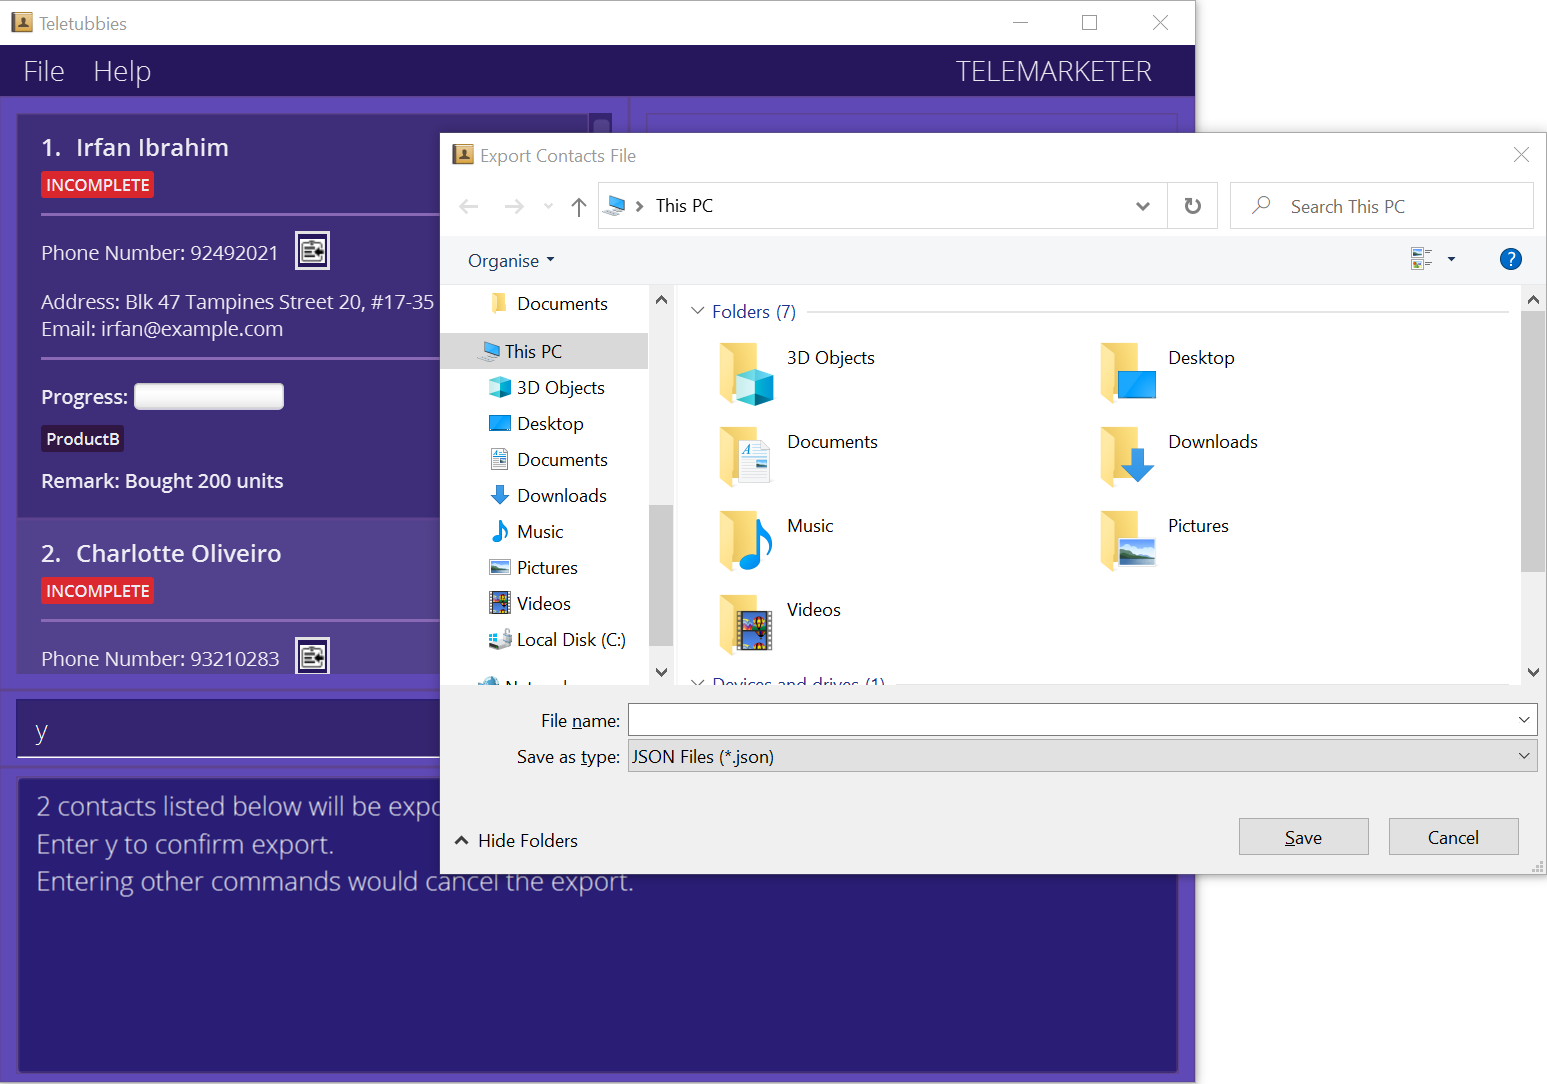
Using the file selector, you can choose where the exported file will be saved and name the file. We highly recommend
that you export the file as a JSON file, with the file extension .json.
Format: export [-t TAGS]…
Examples:
-
exportThis command will export all contacts.
-
export -t friendsThis command will export all contacts containing the “friends” tag.
-
export -t friends -t familyThis command will export all contacts containing BOTH the “friends” tag, and the “family” tag.
Listing your previous commands: history
The history command will help you to view all the commands that have been issued by you in the current session. You
can use this command to retrieve and keep a record of previously used commands.
The commands will be displayed in order from the most recently issued command to the earliest issued command.
Format: history

![]() Commands that will be displayed:
Commands that will be displayed:
The current session refers to the duration from the time you start up Teletubbies to the time you close or exit Teletubbies. Once you close or exit Teletubbies, your session will end, and the command history will be reset. The next time you start up Teletubbies, you will not be able to access the command history from your previous session.
Undoing your previous commands: undo
The undo command will help you to undo any changes you have made with your previous command.
Suppose that you entered a command, but realised that you made a mistake! Well, you can simply issue the
undo command to undo your mistake.
If there are no commands that have previously been issued in the current session, Teletubbies will let you know. Otherwise, any changes you may have made with your previous command will be undone, so be careful when using this command!
Format: undo
![]() Note:
Note:
The following commands cannot be undone since they don’t affect contact information:
exportfilterfindhelphistorylistprofile
![]() Retrieving previous versions:
Retrieving previous versions:
Like history, you can only retrieve changes made within your current
session. That is, once you close or exit Teletubbies and close your current session, you will not be able to retrieve
the previous versions of Teletubbies.
Redoing your previous commands: redo
The redo command will help you to redo any undo command you have issued previously.
Suppose that you thought you made a mistake, so you issued an undo command, only to realise later that
it was actually the correct command! Well, you can simply issue the redo command to “undo” your undo, or
simply put, redo a command that you thought was a mistake.
If there are no commands that have previously been issued in the current session, Teletubbies will let you know.
Otherwise, any changes you may have made with your previous undo command will be undone, so be careful when using this
command!
Format: redo
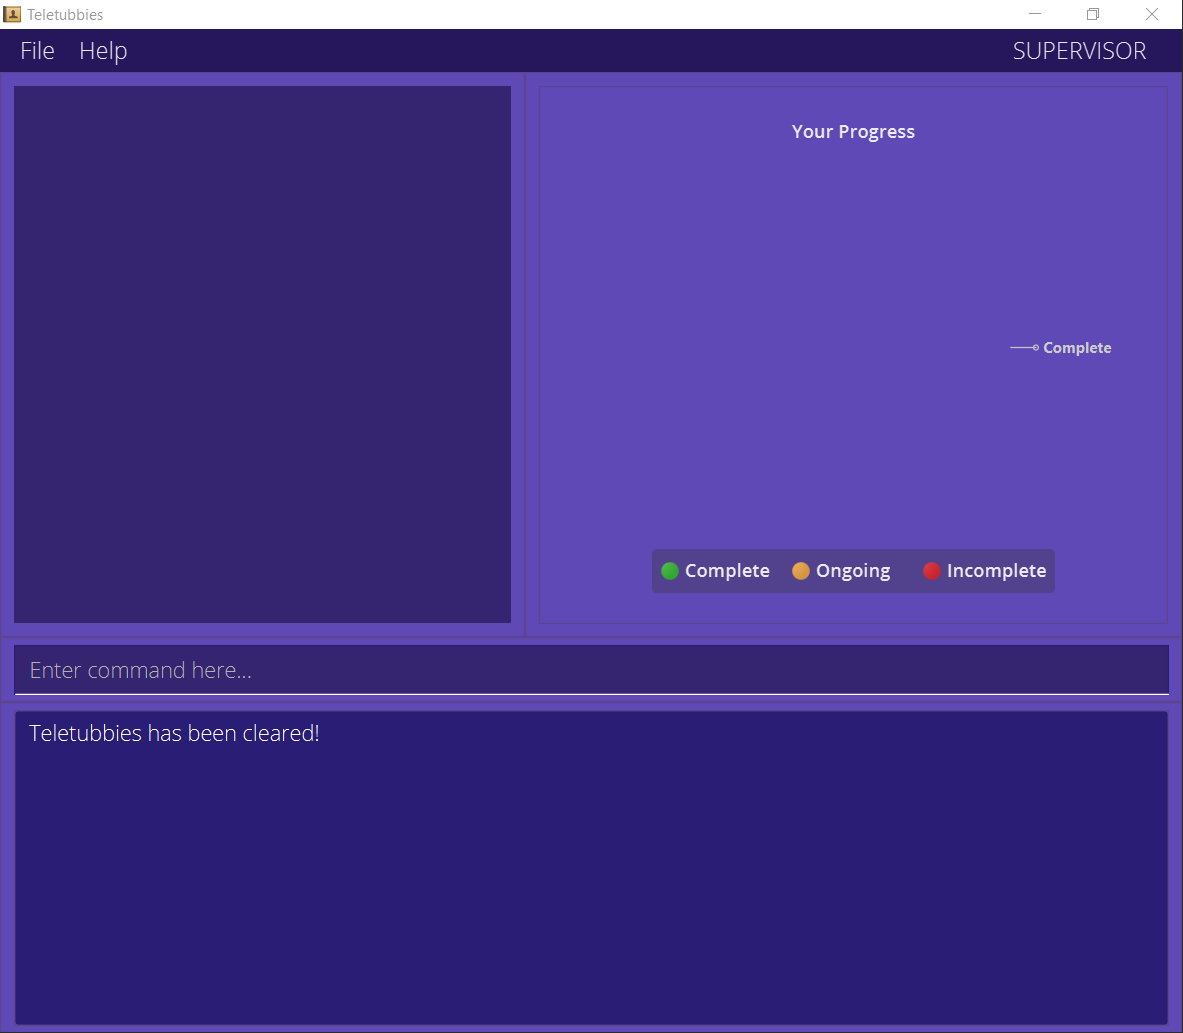
Clearing all entries: clear
The clear command will help you clear all contacts from the Teletubbies application.
Format: clear
Exiting the program: exit
The exit command will help you gracefully exit Teletubbies.
Format: exit
4.2. Contact commands
These commands are related to the contacts stored in Teletubbies. The commands available are:
Finding the index
When dealing with contacts in Teletubbies, you will often have to use something called the index of the contact.
To find out what the contact’s index is, use the List feature to find what number the contact is associated with in the contact list.
The index will always be a positive integer, i.e. 1, 2, 3, 4, …
Copying phone numbers
We understand that as telemarketers, you may be using a desktop application to call a customer instead of using your phone.
Hence, Teletubbies tries to help out in this area as well! Next to the phone number in each contact, there is a small
clipboard icon that looks like this: ![]()
When you click on the icon, it will copy the phone number to your clipboard, so that you can paste it onto your desktop calling app!
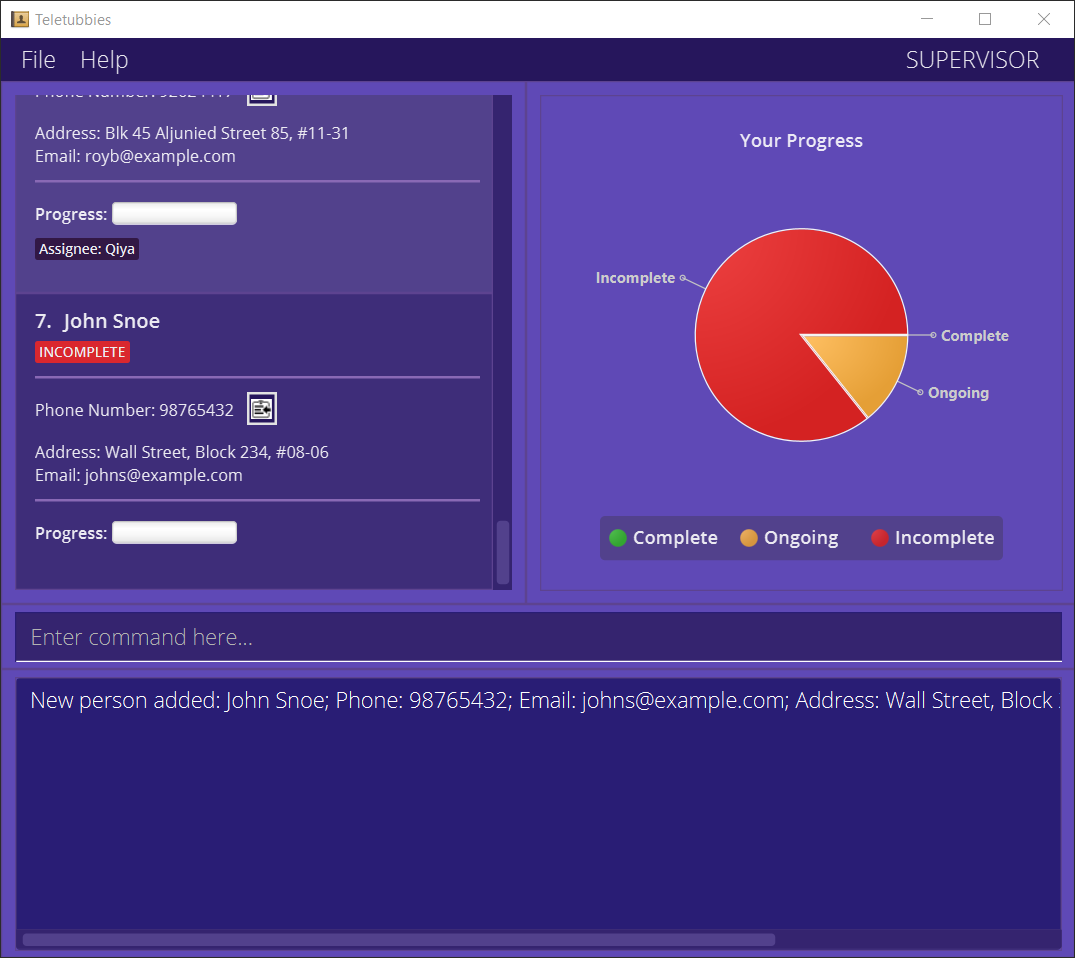
Adding a contact: add
The add command will help you to add a contact to Teletubbies. Once added,
you should be able to view their contact details on the contact list.
Note that the contact’s name and phone number are mandatory. Otherwise, Teletubbies (and you) will find it difficult to identify the contact!
You can also indicate the address and email address of a contact, both of which are optional fields.
Format: add -n NAME -p PHONE_NUMBER [-a ADDRESS] [-e EMAIL]
Examples:
-
add -n Betsy Crowe -p 12345678This command will add the contact details for “Betsy Crowe”, with their phone number as “12345678”.
-
add -n John Snoe -p 98765432 -a Wall Street, Block 234, #08-06 -e johns@example.comIn the example below, “John Snoe” has been added to Teletubbies with their phone number as “98765432”, address as “Wall Street, Block 234, #08-06”, and their email address as “johns@example.com”.
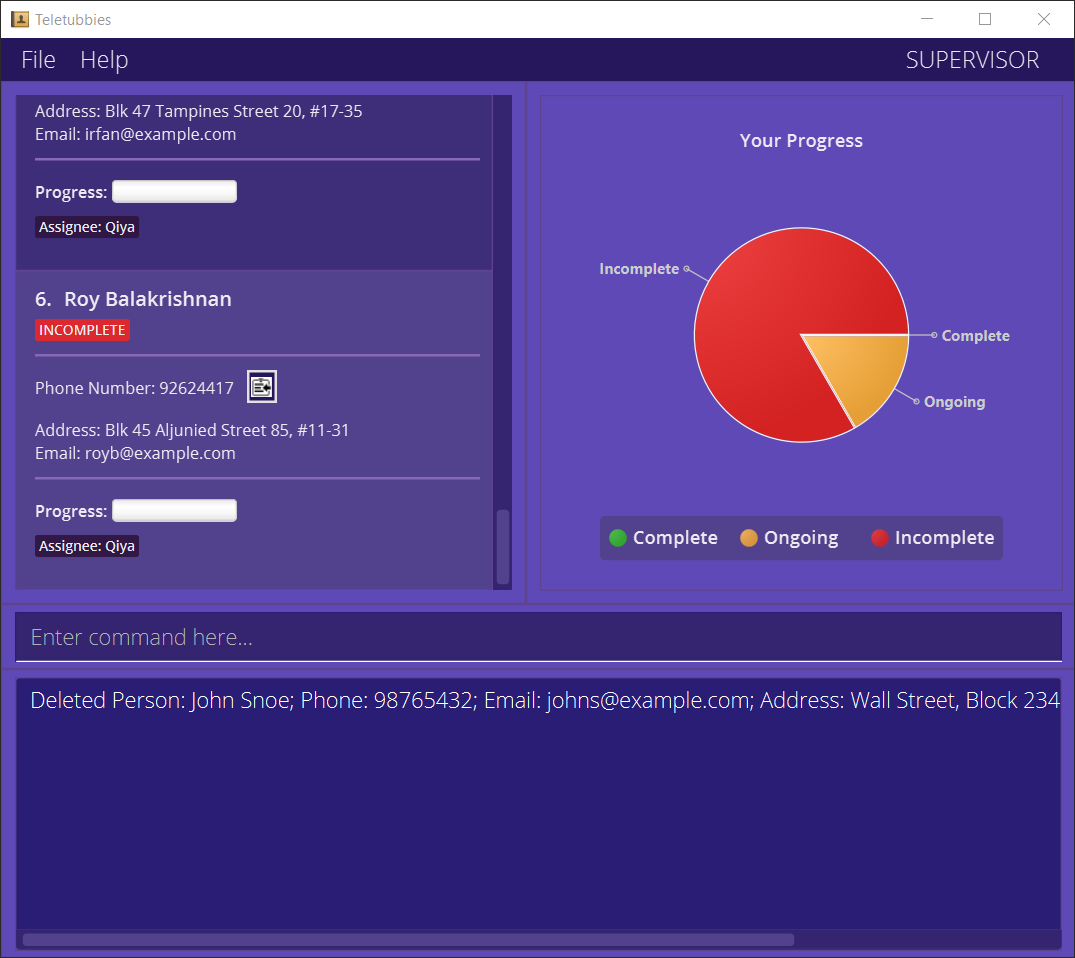
Deleting a contact: delete
The delete command will help you to delete a customer’s contact details from Teletubbies. Once
the contact has been deleted, you should no longer see their contact details on the contact list.
You can choose to delete the contact using either the index, or the phone number. When deleting the contact using the phone number, make sure that the specified phone number is associated with a contact in the contact list.
![]() Tip: If you don’t know what the index is, refer to Finding the index!
Tip: If you don’t know what the index is, refer to Finding the index!
Format: delete -p PHONE_NUMBER or delete -i INDEX
Examples:
-
delete -i 1This command will delete the contact details for the contact with the index 1.
-
delete -p 98765432This command will delete the contact details for the contact with the phone number “98765432”. In the example below, John Snoe has been deleted.
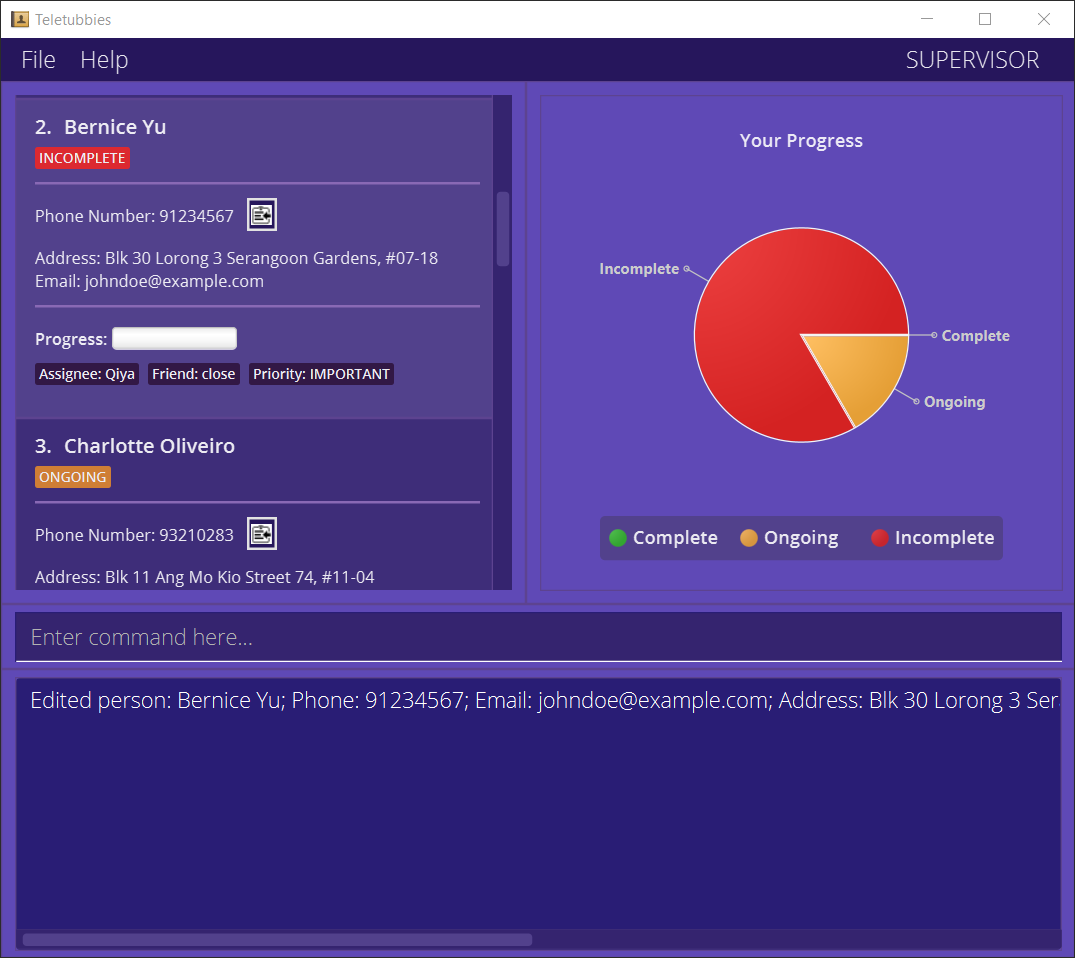
Editing a contact: edit
The edit command will help you to edit a customer’s contact details in Teletubbies. Note that
you can only edit the details for a contact that is already in Teletubbies’ contact list.
You can choose which contact to edit by using the contact’s index. If you don’t know what the index is, refer to Finding the index.
When editing the contact, you can change the following fields: the name, the phone number, the address, and the email address of the customer.
Each field is treated as separate, and all four fields are optional, meaning that you can choose to edit only one or two out of the four fields. However, at least one field should be provided (otherwise, you won’t be editing anything).
Format: edit INDEX [-n NAME] [-p PHONE] [-e EMAIL] [-a ADDRESS]
Examples:
-
edit 1 -n Betsy CrowerThis command will edit the name of the first person in the list to be “Betsy Crower”.
-
edit 2 -p 91234567 -e johndoe@example.comIn the example below, Bernice Yu’s phone number has been edited to be “91234567”, and the email address to be “johndoe@example.com”.
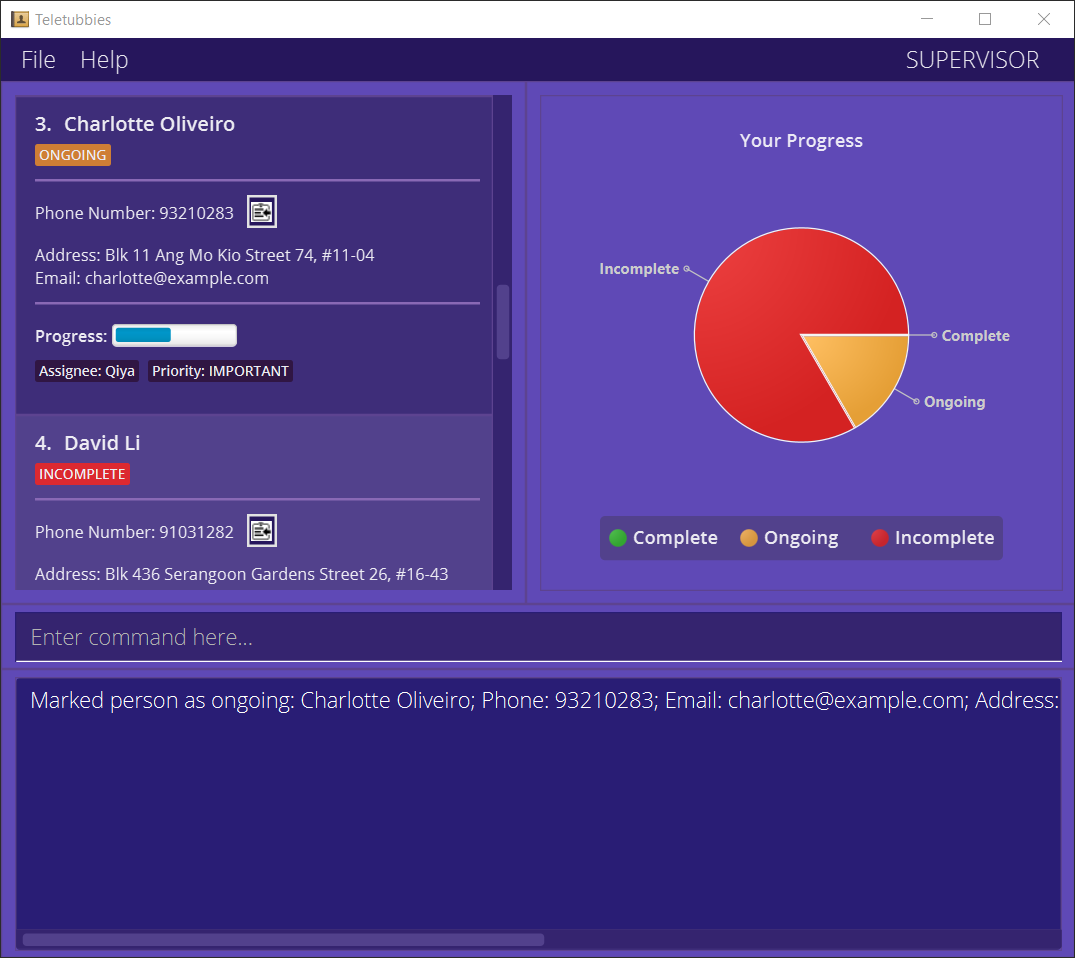
Marking a contact as completed: done
The done command will help you to mark a contact’s completion status in Teletubbies. Here, when we say “completion
status”, we will leave it up to your company to decide exactly what each of the levels of completion status mean.
Regardless, Teletubbies provide three different levels of completion status: Incomplete, Ongoing, and Complete. Take note that a contact can only be marked with at most one out of the three. You can’t have a contact be complete and ongoing at the same time! The status is indicated in each of the contact details using a tag and a progress bar.
You can mark a contact with any of the three levels using the index of the contact. If you don’t know what the index is, refer to Finding the index.
You will also be able to see the total level of completion status for a list of customers using the “Your Progress” tab, which displays the information using a chart. Refer to Progress Chart for more details.
Format: done INDEX [STATUS]
Examples:
-
done 1This command will mark the first contact in the list as “Complete”.
-
done 2 -incThis command will mark the second contact in the list as “Incomplete”.
-
done 3 -ongIn the example below, Charlotte has been marked as “Ongoing”.
Tagging contacts: tag
The tag command will help you to tag certain contacts with a tag of your choice. In Teletubbies,
our tags are very flexible: They can be single words, or a category. So for example, you can tag a contact
with “friend”, or tag a contact with the category “status: not answering”, etc. It’s up to you!
Do note that there is a special category of tag, which is the completion status.
This tag cannot be added, edited or removed by the tag command or the tagrm command, and is only changeable using
the done command. Please refer to Marking a contact as completed.
When tagging a contact, you can specify the name and value of the tag. The name is mandatory, but the value is optional. To specify which contact to be tagged, use the index of the contact. If you don’t know what the index is, refer to Finding the index.
Take note that contacts cannot have tags with duplicate names. So, if you have a contact that is already tagged,
and you decide to tag it again with the same name but different value, the new value will replace the old
one! For example, if a contact tagged with Friend: good, and is then tagged using another tag with the name
“Friend” and the value “close”, the pre-existing tag will be updated from Friend: good to Friend: close.
Finally, there is an additional parameter that is only available to supervisors. When you add a -s at the end
of your tagging command, it will make sure that only supervisors are able to edit or remove that tag!
Format:tag INDEX -n TAGNAME [-v VALUE] [-s]
Examples:
-
tag 1 -n FriendThis command will tag the first contact in the list with the tag
Friend. -
tag 4 -n Assignee -v Mel -sThis command will tag the fourth contact in the list with the tag
Assignee: Mel. Because of the-s, this tag will only be editable / removable by users whose roles are set as “Supervisor” For more information on roles, refer to Setting your profile.
-
tag 2 -n Friend -v closeIn the example below, Bernice has been given the tag
Friend: close.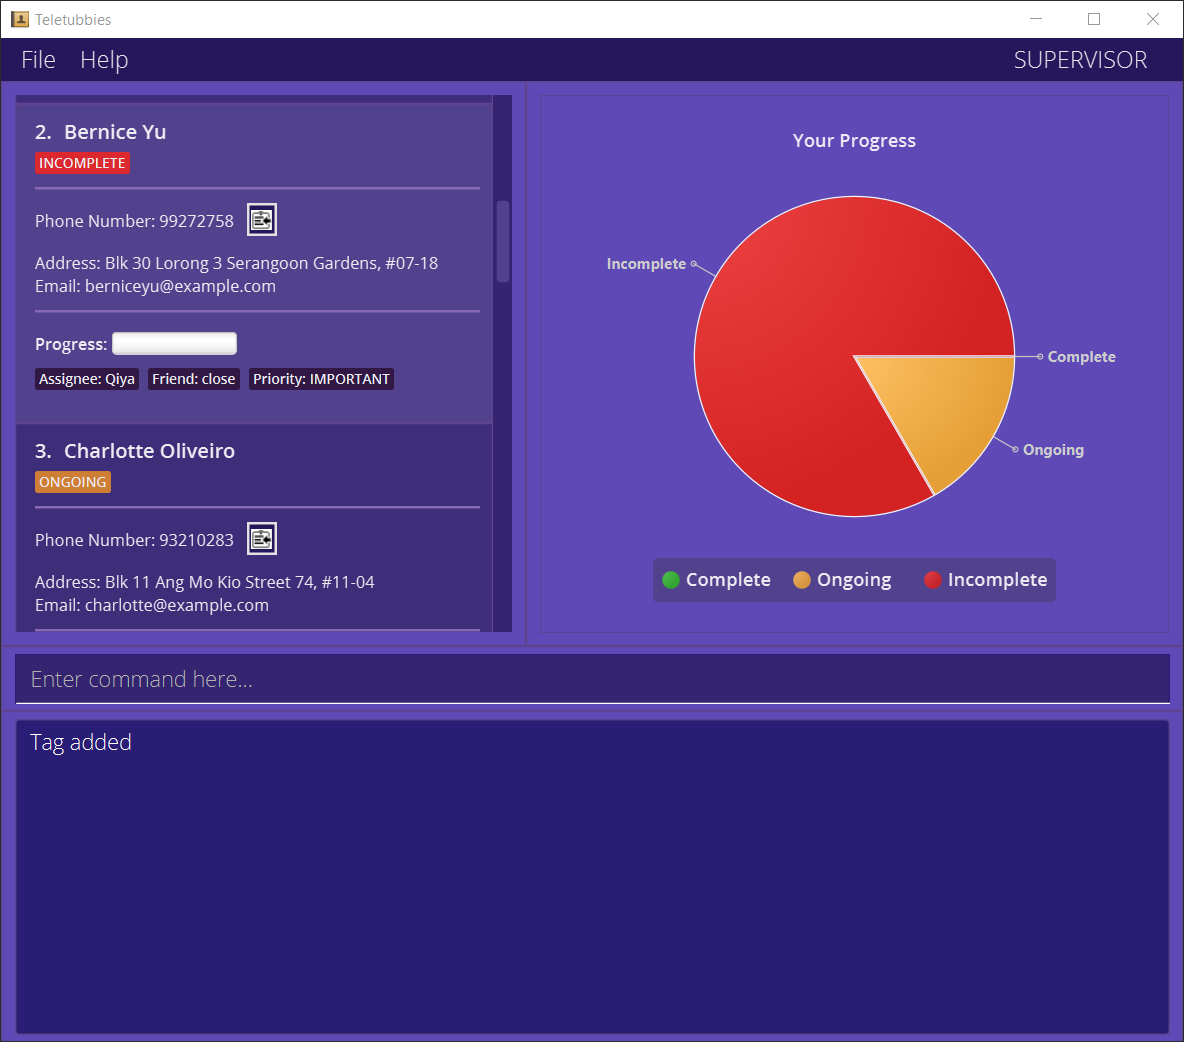
Removing tags from contacts: tagrm
The tagrm command will help you to remove a tag from a contact. Note that the tag to be removed
must already be a tag on the contact, otherwise no tags will be removed!
When removing a tag from a contact, you can specify the name and value of the tag. Similar to the tag command,
the name is mandatory, but the value is optional. To specify which contact to be tagged, use the index of the
contact. If you don’t know what the index is, refer to Finding the index.
Note that tag name and tag value are case-sensitive. So, a command specifying tag name ‘assignee’ and tag value ‘john’
will not remove the tag Assignee:John or Assignee:john.
Also, if the tag was created using the -s parameter, only supervisors will be able to remove the tag.
Format:tagrm INDEX -n TAGNAME [-v VALUE]
Examples:
-
tagrm 1 -n Friend -v closeThis command will remove the tag
Friend: closefrom the first contact in the list.
-
tagrm 2 -n FriendIn the example below, Bernice has the tag
Friend: closeremoved :(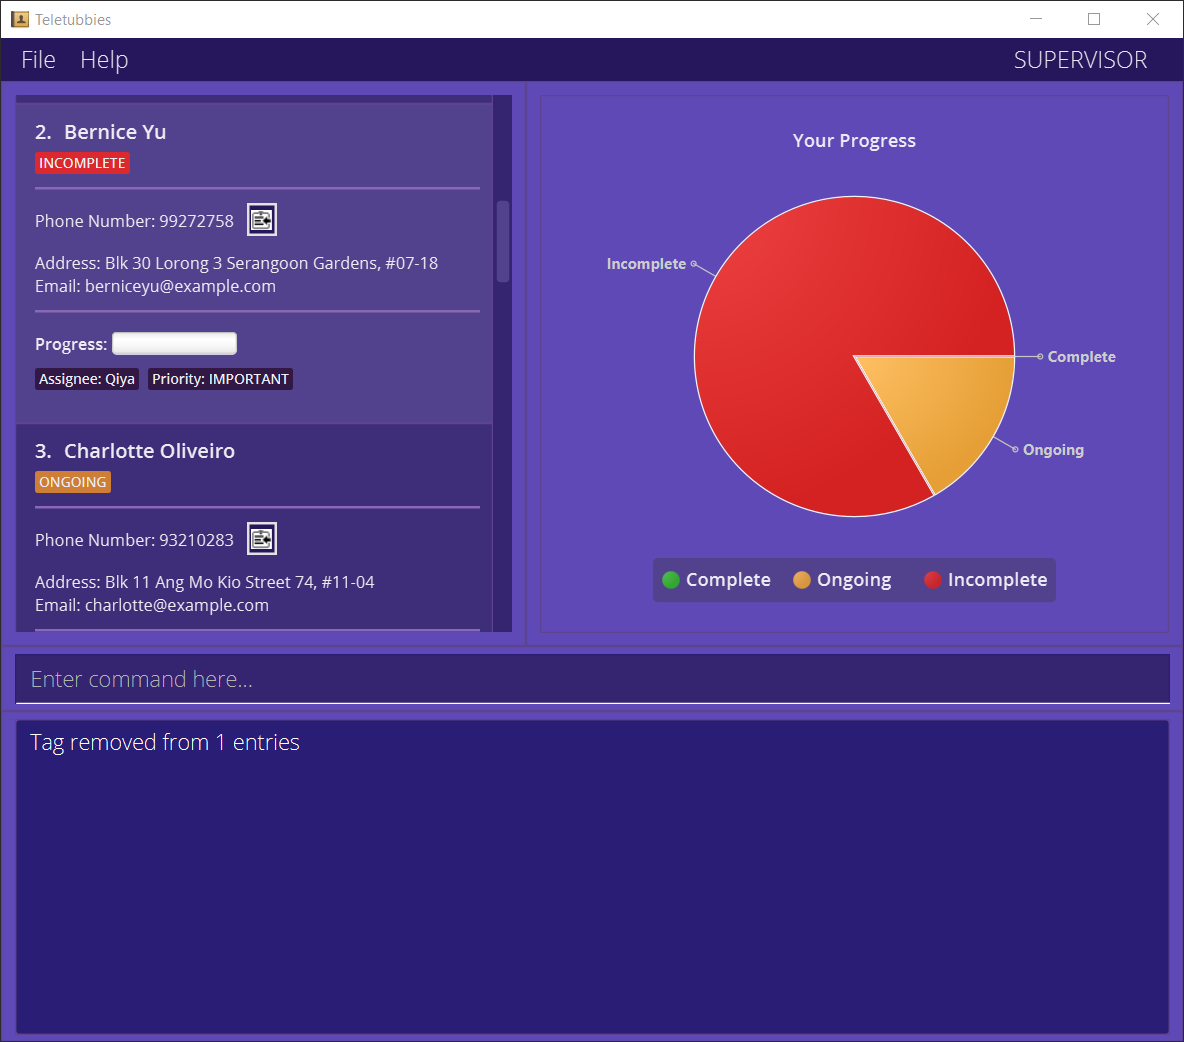
Tagging and Removing tags from multiple contacts
Sometimes, you may need to assign the same tag to more than just one contact, or remove the same tag from more than just one contact.
You can use the tag and the tagrm commands to do so! Just specify a range of numbers as the index rather than a
single number.
Format (tag): tag INDEX [,INDEX]… -n TAGNAME [-v VALUE] [-s]
Format (tagrm): tagrm INDEX [,INDEX]… -n TAGNAME [-v VALUE]
OR
Format (tag):tag START-END -n TAGNAME [-v VALUE] [-s]
Format (tagrm):tagrm START-END -n TAGNAME [-v VALUE]
Examples (tag):
-
tag 1,2,4 -n Friend -v closeThis command will tag the first, second, and fourth contact in the list with the tag
Friend: close. -
tag 1-5 -n Friend -v closeThis command will tag the first five contacts in the list, with the tag
Friend: close. -
tag 1-10 -n Assignee -v Mel -sThis command will tag the first ten contacts in the list with the tag
Assignee: Mel. Because of the-s, this tag will only be editable / removable by users whose roles are set as “Supervisor” For more information on roles, refer to Setting your profile.
Examples (tagrm):
-
tagrm 1,2,4 -n FriendThis command will remove the tag
Friendfrom the first, second, and fourth contact in the list. -
tagrm 1-5 -n FriendThis command will remove the tag
Friendfrom the first five contacts in the list.
Adding a remark to a contact: remark
The remark command will help you to add a remark to a chosen contact in the list. Remarks are a more general version
of the tags - the feature is for you to add extra information to a contact that you cannot add using tags. Note that a
remark cannot be longer than 40 letters!
To specify which contact to add a remark to, use the index of the contact. If you don’t know what the index is, refer to Finding the index.
Format: remark INDEX -r REMARK
Examples:
-
remark 1 -rThis command will remove the existing remark from the first contact in the list.
-
remark 1 -r Not answering any callsThis command will add the remark
Not answering any callsto the first contact in the list.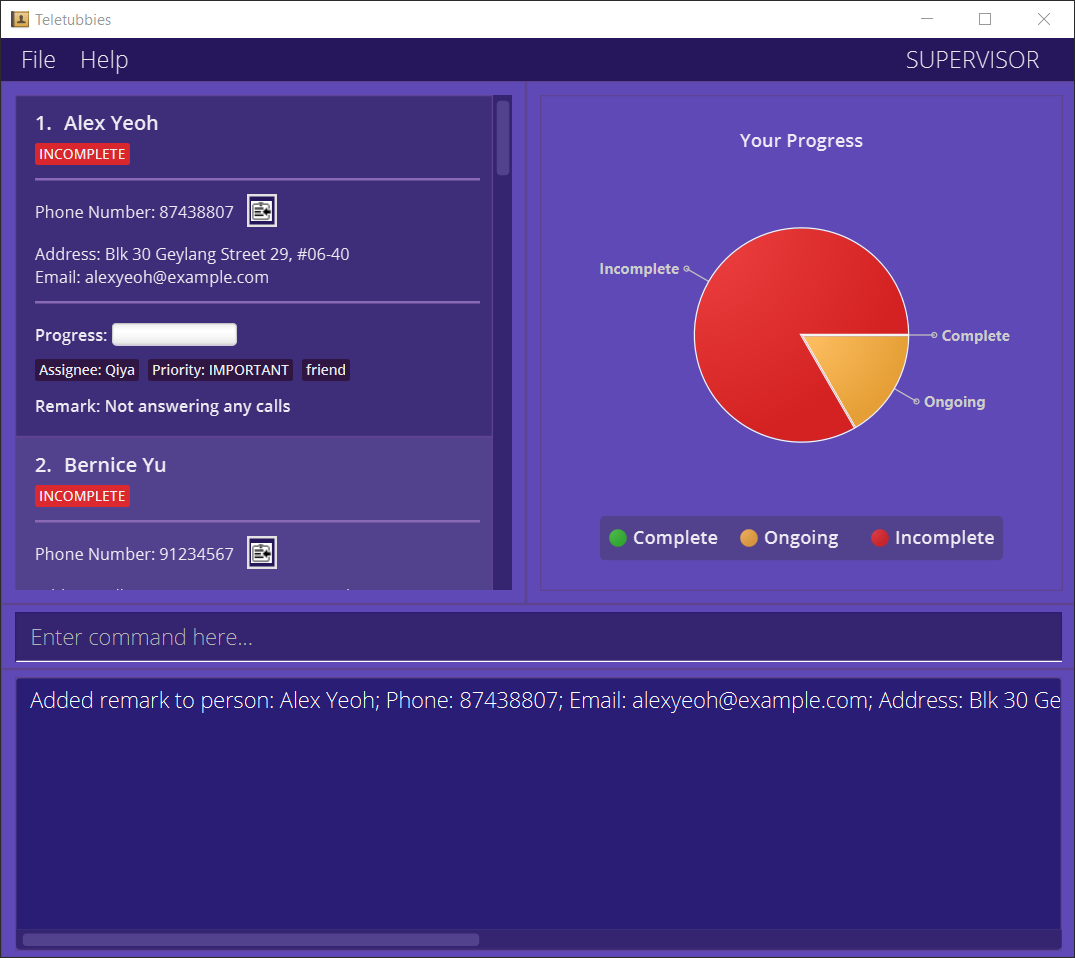
![]() Only one remark allowed per contact
Only one remark allowed per contact
A contact can only have a maximum of one remark. If a contact already has a remark, any new remark added will replace the existing remark.
4.3. List commands
These commands are related to the contact list stored in Teletubbies. The commands available are:
Listing all contacts: list
The list command will help you to view the entire contact list currently in Teletubbies.
By listing all contacts, you will be able to find the number associated with a specific contact that you want to interact
with. This number is known as the index of the contact.
Format: list
Locating contacts by name: find
The find command will help you find relevant contacts whose names contain the given keyword(s), and will update the contact list to display the search results.
When Teletubbies searches the contacts using the given keyword(s), it will only look at the names of the contacts, not the phone numbers, addresses or the email addresses.
The order of the keywords given does not matter, and any contact whose name contains any one of the keywords will be returned.
Format: find KEYWORD [KEYWORD]…
Examples:
-
find JohnThis command will return all contacts whose names contain “John”, such as
John,john, orJohn Doe. As mentioned below, it is case-insensitive. -
find joThis command will return all contacts whose names contain “jo”, such as
JohnorJoe.
-
find alex davidThis command will return all contacts whose names contain “alex” or “david” in no particular order, such as
Alex Yeoh,david li, orDavid alex.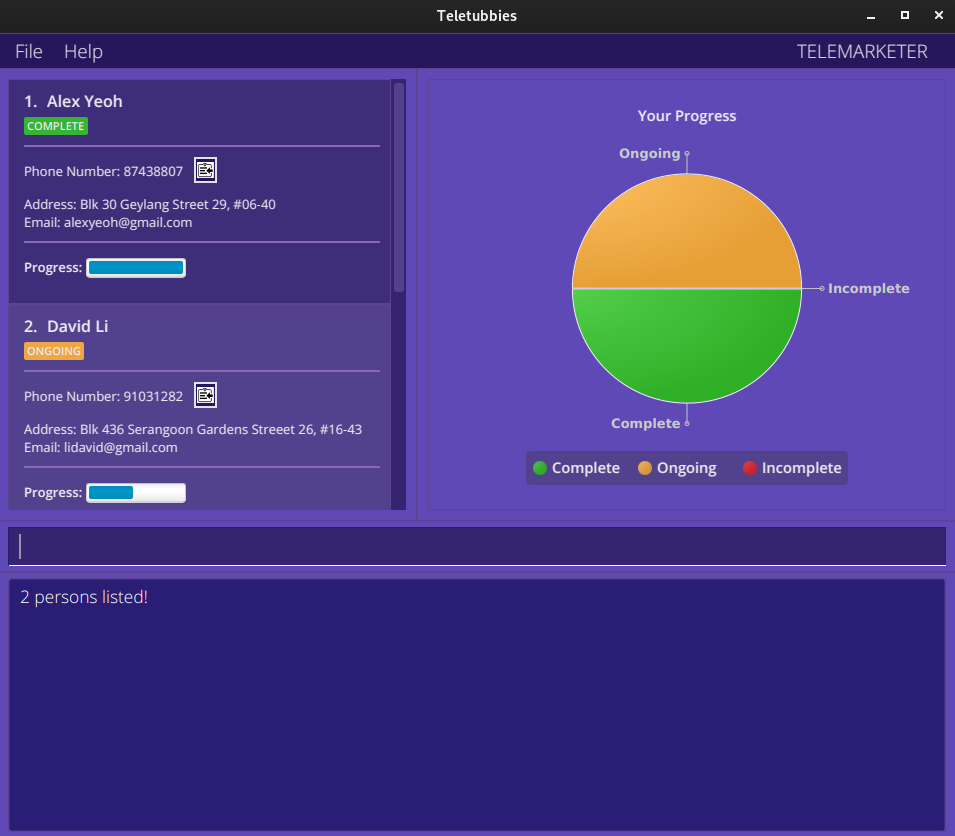
![]() Keywords are case-insensitive:
Keywords are case-insensitive:
The search process is case-insensitive, meaning that if a keyword hans is given, a contact with the name Hans may
be returned.
Filtering contact list: filter
The filter command will help you filter the current contact list using the given tag(s), and will change the contact
list display to show only the contacts that are tagged with the given tag(s). This command can help you focus on
specific contacts of interest (like contacts tagged as important) instead of scrolling through a long list of contacts.
When issuing the filter command, you should specify at least one tag name. Tag values are optional, but can help
to further narrow your filter if necessary.
![]() Tag name and tag value are case-sensitive:
Tag name and tag value are case-sensitive:
This means that the following tags are different:
assignee: johnassignee: JohnAssignee: John
Format: filter -t TAGNAME[:TAGVALUE] [-t TAGNAME[:TAGVALUE]]…
Examples:
-
filter -t FriendThis command will filter the displayed list to only users who have the tag
Friend, regardless of tag value. This means that persons with the tagsFriend: Close, ANDFriend: VeryClosewill both be listed. -
filter -t Assignee:BenThis command will filter the displayed list to only users who have the tag
Assignee: Ben. Persons with theAssignee: Sidtag will NOT be listed.
-
filter -t Friend -t Assignee:BenThis command will filter the displayed list to only users who have the tag
FriendANDAssignee: Ben. Contacts that have only one of the given tags will NOT be listed.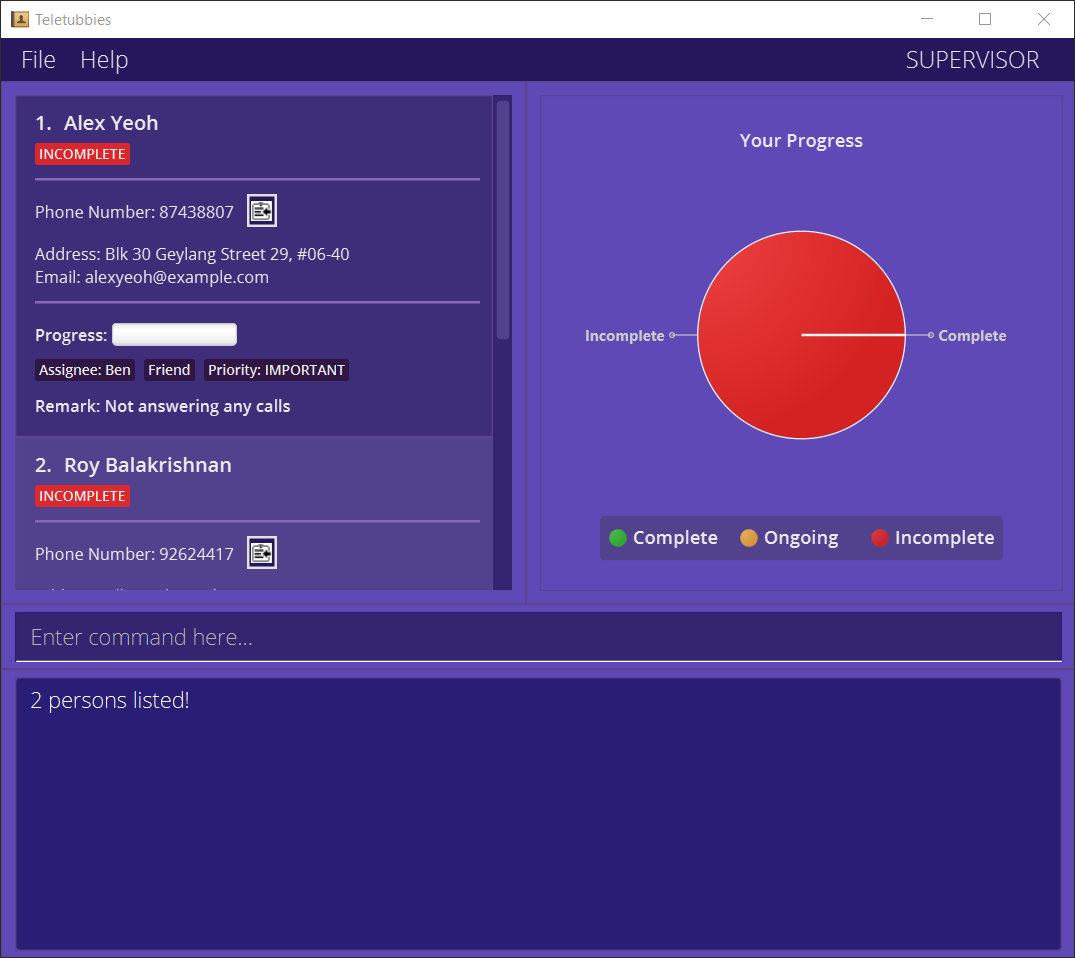
4.4. Other features
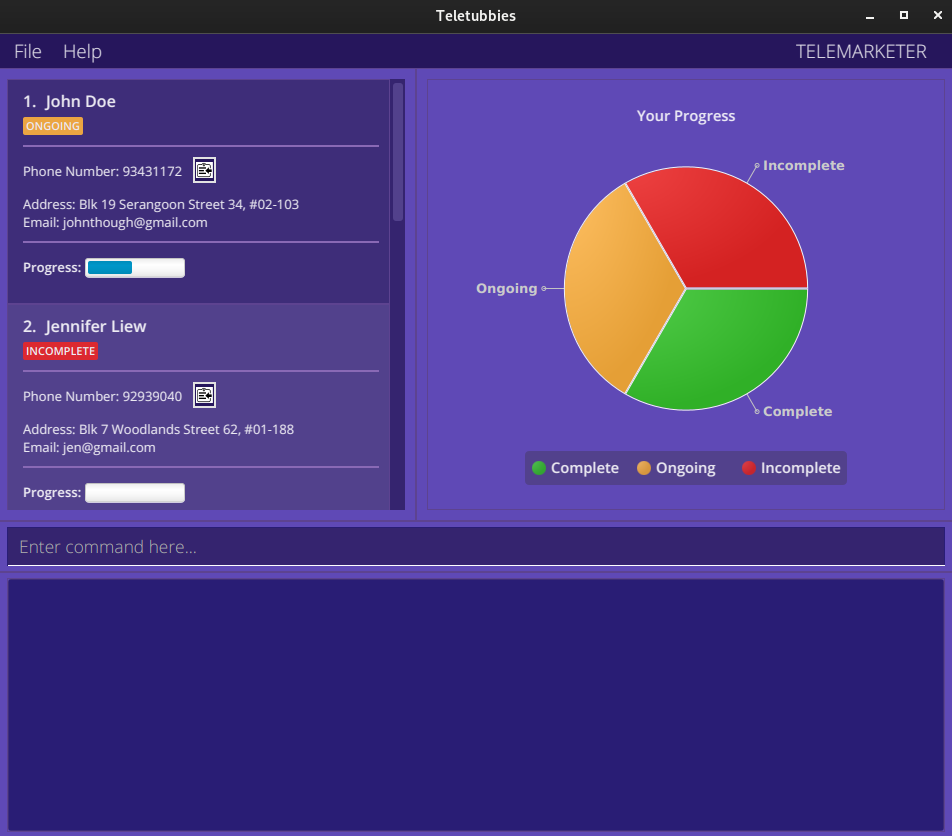
Progress Chart
Since each contact has a completion status tied to it with the levels of completion status
Complete, Ongoing, or Incomplete, Teletubbies will automatically collate the data and
create a nice pie chart to display the aggregate completion status of the current list.
Whenever the list that you are viewing changes (usually when issuing list commands), the chart will update automatically!
Convenience features
Sometimes, you may feel hard-pressed from typing these commands repeatedly. You can avoid this by trying out some of our convenience features in Teletubbies. These include:
- Pressing the [UP] arrow button on your keyboard to retrieve a previously keyed-in command,
![]() Tip:
You can only access the previous commands up to the first command keyed in after starting Teletubbies. Once the earliest
command is obtained, you will continue to see that command on the text input box.
Tip:
You can only access the previous commands up to the first command keyed in after starting Teletubbies. Once the earliest
command is obtained, you will continue to see that command on the text input box.
- Pressing the [DOWN] arrow button on your keyboard to retrieve the command after the current command,
![]() Tip:
Once the most recent command is obtained, you will continue to see that command on the text input box.
Tip:
Once the most recent command is obtained, you will continue to see that command on the text input box.
- Pressing the [TAB] key after typing a command to automatically complete and suggest to you the required fields needed for the command word.
![]() Tip:
For instance, pressing the [TAB] key after typing
Tip:
For instance, pressing the [TAB] key after typing add produces add -n -p -e -a on the text input box.
Here is an image of the command box before pressing the [TAB] key:

And here is an image of the command box after pressing the [TAB] key:

It is important to note that pressing the TAB key will only work if the given word is a command word. For example,
if you type ad and then press the TAB key, the given text will remain.
Saving the data
Teletubbies automatically saves the data in the hard disk after any command that changes the data. There is no need to save manually.
For exporting the current data as a separate JSON file, refer to Exporting contacts.
Loading the data
Teletubbies will automatically load up the data from your previous session, allowing you to pick up right where you left off. There is no need to load manually.
For importing a contact list in the JSON file format into the application, refer to Importing contacts. For merging a contact list from your hard disk with the contact list on the application, refer to Merging contact lists
Editing the data
Teletubbies will save the data as a JSON file [JAR file location]/data/teletubbies.json. Advanced users are welcome
to update data directly by editing that data file.
5. FAQ
Q: How do I transfer my data to another Computer?
- Install the Teletubbies app in the other computer.
- Use the
exportcommand to export your contacts as a JSON file. Transfer the contacts file to the other computer. - On the other computer, launch the Teletubbies app and use the
importcommand to import the contacts file that you transferred over.
Q How do I change my role after setting it once?
- In the same folder as
teletubbies.jar, look for thepreferences.jsonfile. -
In
preferences.json, locate theisProfileSetfield and set it to false as follows:{ ... "userProfile" : { "name" : "", "role" : "SUPERVISOR" }, "isProfileSet" : false, // set this field to false ... } - When you restart Teletubbies, you should be able to modify your role with the profile command.
6. Command Summary
These are all the available commands in Teletubbies.
To navigate to the section for each command, click on the hyperlinked commands in the left column. The sections outline the detailed usage and examples for each of the command.
| System commands | Format |
|---|---|
| help | help |
| profile | profile -n NAME -role ROLE |
| import | import |
| merge | merge |
| export | export [-t TAGS]… |
| history | history |
| undo | undo |
| redo | redo |
| clear | clear |
| exit | exit |
| Contact commands | Format |
|---|---|
| add | add -n NAME -p PHONE_NUMBER [-a ADDRESS] [-e EMAIL] |
| delete |
delete -p PHONE_NUMBER or delete -i INDEX
|
| edit | edit INDEX [-n NAME] [-p PHONE] [-e EMAIL] [-a ADDRESS] |
| done | done INDEX [STATUS] |
| tag | tag INDEX -n TAGNAME [-v VALUE] [-s] |
| tagrm | tagrm INDEX -n TAGNAME [-v VALUE] |
| tag (multiple contacts) |
tag INDEX [,INDEX]… -n TAGNAME [-v VALUE] [-s] tag START-END -n TAGNAME [-v VALUE] [-s]
|
| tagrm (multiple contacts) |
tagrm INDEX [,INDEX]… -n TAGNAME [-v VALUE] tagrm START-END -n TAGNAME [-v VALUE]
|
| remark | remark INDEX -r REMARK |
| List commands | Format |
|---|---|
| list | list |
| find | find KEYWORD [KEYWORD]… |
| filter | filter -t TAGNAME[:TAGVALUE] [-t TAGNAME[:TAGVALUE]]… |
7. Glossary
This section serves to provide a summary of descriptions and definitions of terms used throughout this User Guide. Familiarising yourself with this section will make the User Guide easier to read.
| Term | Meaning |
|---|---|
| Java | A runtime environment that allows applications such as Teletubbies to be run on your computer. |
| JavaScript Object Notation (JSON) | A text-based representation of structured data that is used to save contacts as files in Teletubbies. |
| Command-line Interface (CLI) | A user interface that allows users to interact with a system through text commands. |
| Graphical User Interface (GUI) | A user interface that allows users to interact with a system through graphical icons. |
| Command | An instruction typed by a user, to be executed by Teletubbies. |
| Parameter | Input to a command’s field. |
8. Acknowledgements
This project is based on the AddressBook-Level3 project created by the SE-EDU initiative.
During the development process, we have used the following libraries: